Inside the Health App
Updated for iOS 12 and Watch OS 5 on March 14, 2019
Introduction to the Health App
![]() The Health app on the iPhone keeps all of your health data from the iPhone, Apple Watch, third-party apps and accessories in one place. This makes it easier than ever before to use your iPhone and Apple Watch to improve your health and fitness.
The Health app on the iPhone keeps all of your health data from the iPhone, Apple Watch, third-party apps and accessories in one place. This makes it easier than ever before to use your iPhone and Apple Watch to improve your health and fitness.
The Health app was introduced by Apple as part of iOS 8 in September 2014. Virtually all iPhones that are being used today include the Health app, although many iPhone users don’t even know that it exists, let alone how to use it.
In order to consolidate all of your Health and Fitness information on the iPhone, Apple allows 3rd party apps and accessories to insert data into the Health app, and retrieve data that has previously been stored in the Health app. There are many iOS apps that work seamlessly with the Health app.
Security / Privacy
Access to the Health app by 3rd party apps and accessories is managed by you. This gives you complete control over your personal Health and Fitness information that is stored on your iPhone. Before any app can read data from, or write data to the Health app, you must explicitly give that app permission to access this data.
The first time you run an app that would like access to the Health app’s data, it will ask for your permission. You can allow access to any or all of the items that the 3rd party app requests access to. Your health information can only be accessed by 3rd party apps that have been given explicit permission by you. At any time, you can change these permissions from within the Health app.
In order to make sure that all data which is stored in the Health app is secure, when you sync your iPhone with iTunes on your Desktop Computer, your Health app data won’t be backed up unless you have specified that your backup is encrypted. If you backup your iPhone to iCloud, your data is automatically encrypted and secure.
Getting Started
 The first time you run the Health app, it will take you through a series of steps to set it up before you start using it. The first screen is the Welcome to Health screen. On this screen you can view the Health app’s Overview Video to understand Apple’s philosophy about Health and Fitness on the iPhone. Tap the Next button at the bottom of the screen to continue.
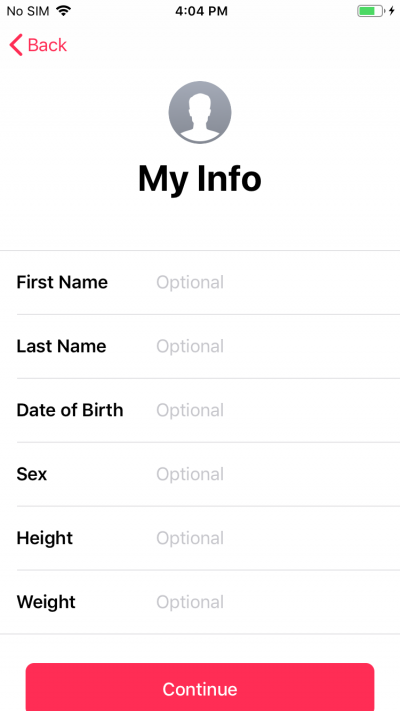
On the My info screen you can create your personal profile which contains the following information:
- First Name
- Last Name
- Date of Birth
- Sex
- Height
- Weight
Fill in whichever information that you would like to. Anything that you haven’t filled in can be filled in later. Once you have entered the Personal Profile data, tap the Continue button at the bottom of the screen.
On the Medical ID screen, you can create your Medical ID. If you’d like to create it, tap the Create Medical ID button. If you want to do this at a later time tap the Not Now button. If you created the Medical ID, tap Done to continue with the setup of the Health app.
If you are in the USA, you will see the Organ Donation screen and you can choose to register as an Organ Donor with Donate Life America’s organ donation registry. If you would like to register, tap the Sign Up button. Otherwise, tap I’m Already a Donor, or Not Now.
If you are not in the United States, you can specify that you are an organ donor, but you can’t register with Donate Life America.
You have now completed the initial setup of the Health app. Tap the Get Started button to continue.
Health App Basics
When you run the Health app, there are four views available:
- Today
- Health Data
- Sources
- Medical ID
You can select which view you’d like to see by tapping it at the bottom of the screen. The selected view is highlighted in red.
Today View
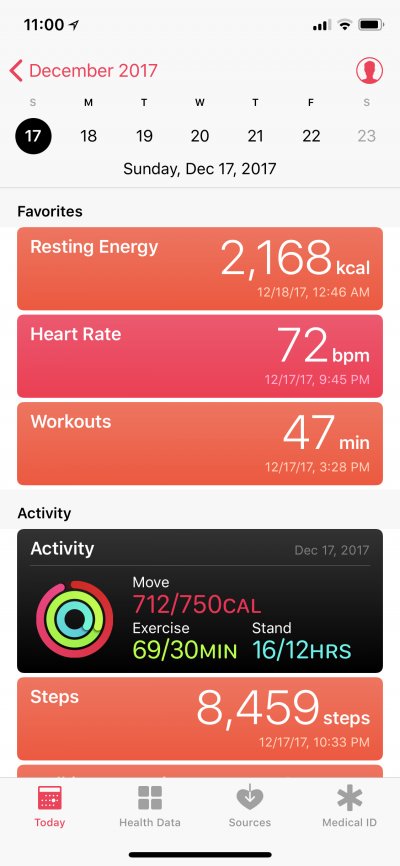 In the Today view, you will see all of the data that has been collected for today. You can view data for any other day by selecting the date at the top of the screen. Tap the month in the top left corner of the screen, and scroll up or down in the calendar until you find the date that you would like to view. You can return to today, by tapping the Today button.
Below the calendar you will see the data for the selected date. Data types that have been specified as Favorites are displayed before all other data. The rest of the data is grouped by category and is shown in the following order: Activity, Mindfulness, Sleep, Nutrition, Body Measurements, Heart, Reproductive Health, Results and Vitals.
For each data type, the summary for that day will be shown. Tapping on any specific data type will open up the details screen for that data type. The details screen is explained later in this post.
In the upper right corner of the Today screen, you will see the profile icon. Tapping on the icon opens the Personal Profile screen of the Health app. See details about the Personal Profile later in this post.
Health Data View
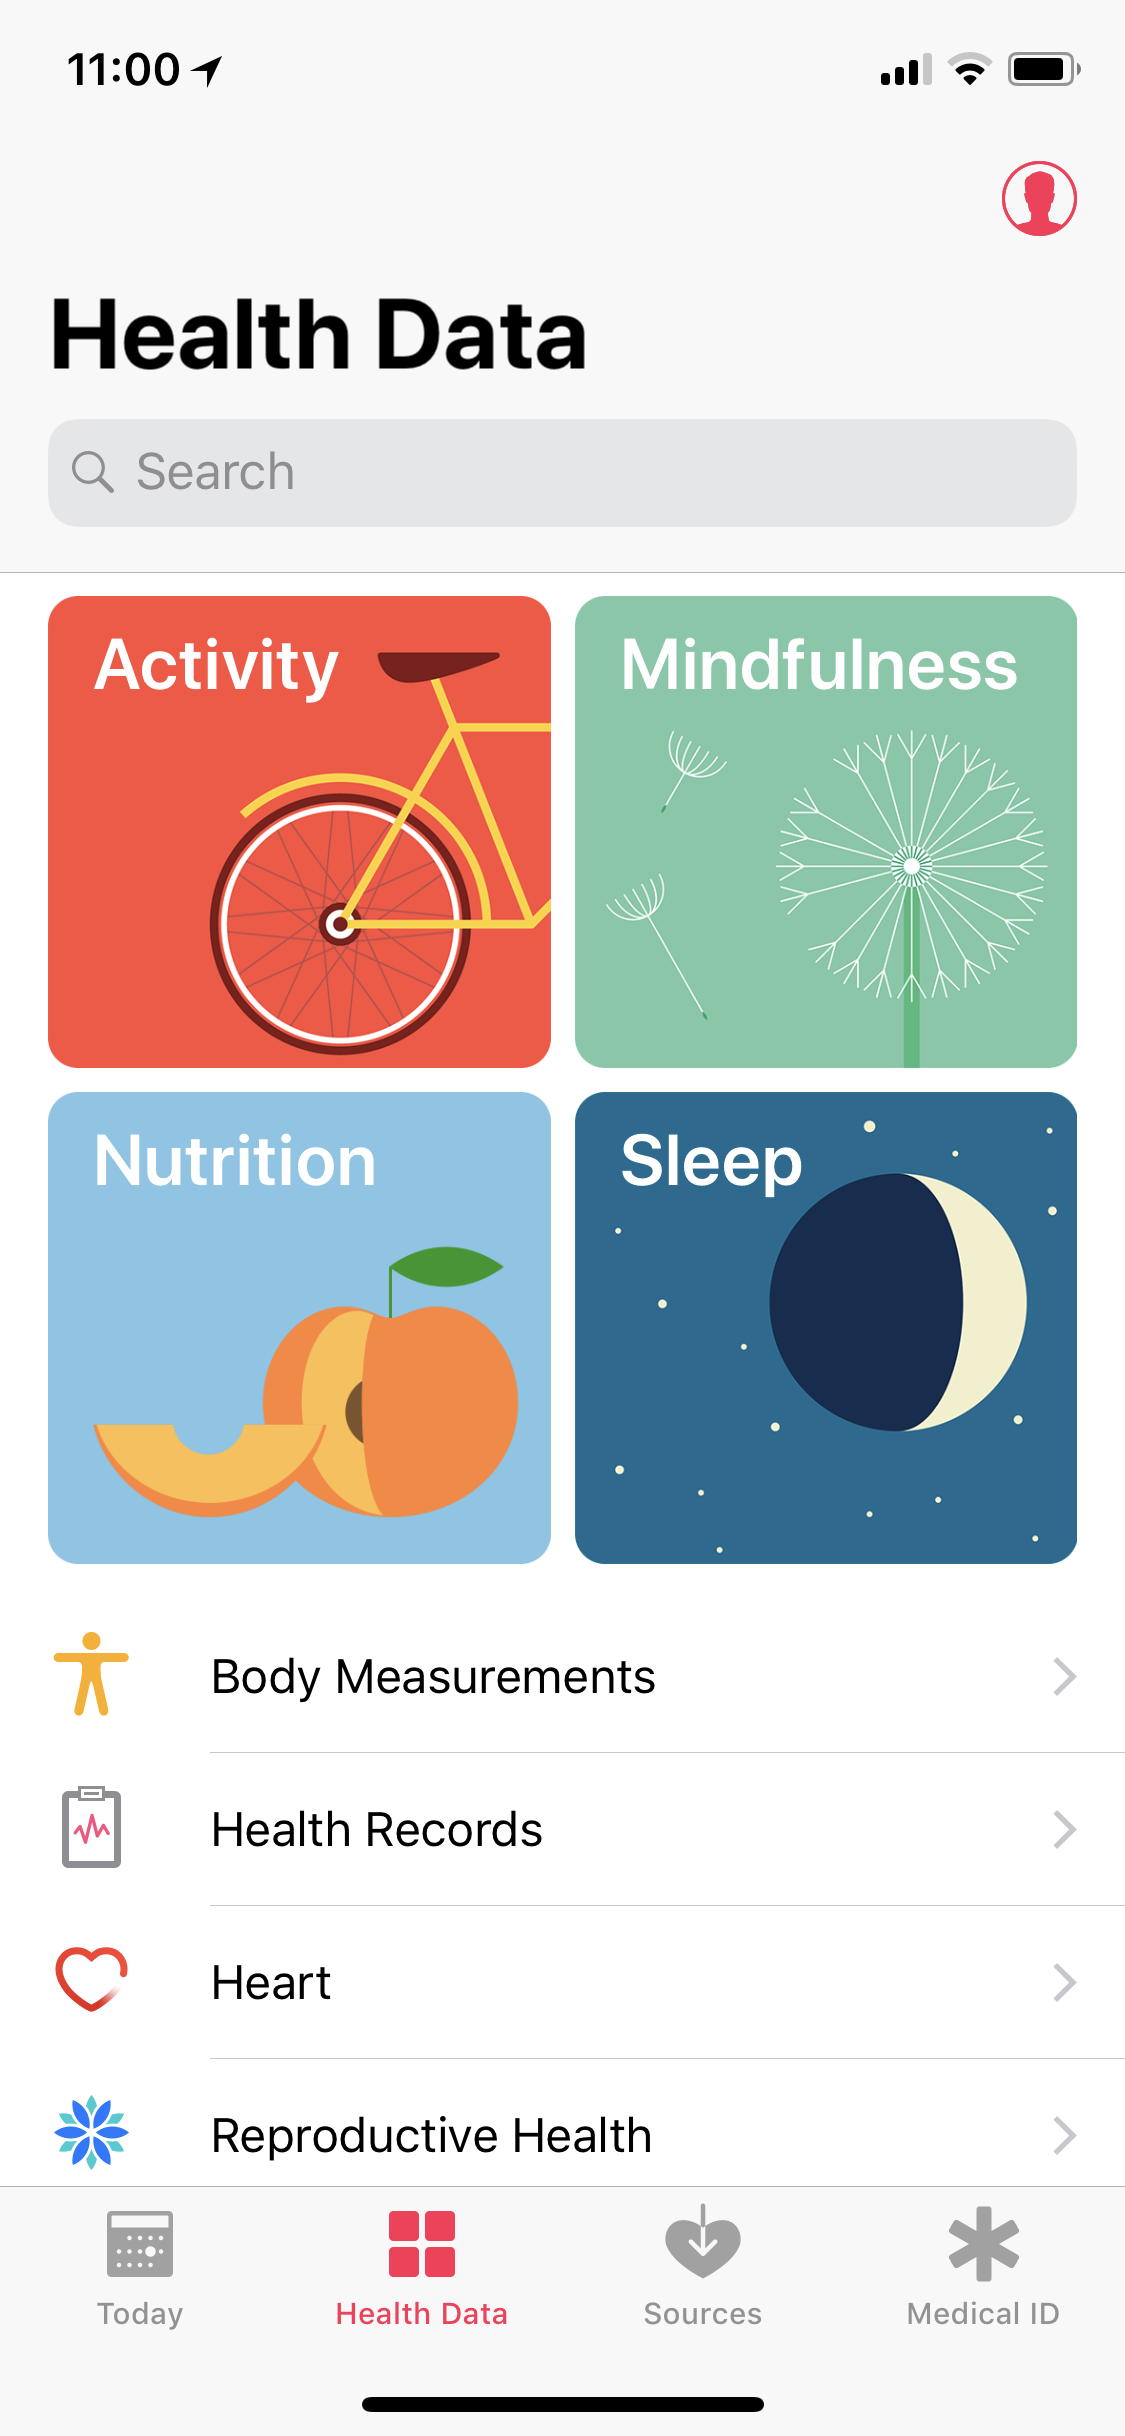 The data in the Health app is divided into the following categories:
- Activity
- Mindfulness
- Sleep
- Nutrition
- Body Measurements
- Health Records
- Heart
- Reproductive Health
- Result
- Vitals
When you tap on any category, you will see the data chart for each data type in the selected category that contains data. All of the data types that have no data will be listed at the bottom of the screen. For the Activity, Mindfulness, Nutrition and Sleep categories, there is a video at the top of the screen that explains the importance of each of those categories. Tap the play button in order to watch the video. Once you have watched the video and added any data, the video will be moved to the bottom of the screen.
If you have specified any of the data types in this category as a Favorite, they will be shown at the top of the screen. Following the favorites you will see all other types that have data. The data types will be shown chronologically based on the date of the most recent record of that data type.
Tapping on any data type will bring you to the details screen. The details screen is explained later in this post.
The following is a list of all categories and their data types:
Activity
Active Energy, Activity, Cycling Distance, Downhill Snow Sports Distance, Exercise Minutes, Flights Climbed, Nike Fuel, Pushes, Resting Energy, Stand Hours, Steps, Swimming Distance, Swimming Strokes, VO2 max, Walking + Running Distance, Wheelchair Distance and Workouts.
Mindfulness
Mindful Minutes
Sleep
Sleep Analysis
Nutrition
Biotin, Caffeine, Calcium, Carbohydrates, Chloride, Chromium, Copper, Dietary Cholesterol, Dietary Energy, Dietary Sugar, Fiber, Folate, Iodine, Iron, Magnesium, Manganese, Molybdenum, Monounsaturated Fat, Niacin, Pantothenic Acid, Phosphorus, Polyunsaturated Fat, Potassium, Protein, Riboflavin, Saturated Fat, Selenium, Sodium, Thiamin, Total Fat, Vitamin A, Vitamin B12, Vitamin B6, Vitamin C, Vitamin D, Vitamin E, Vitamin K, Water and Zinc.
Body Measurements
Body Fat Percentage, Body Mass Index, Height, Lean Body Mass, Waist Circumference and Weight.
Health Records
Health Records
Heart
Blood Pressure, Electrocardiogram (ECG), Heart Rate, Heart Rate Variability, High Heart Rate Notifications, Irregular Rhythm Notifications, Low Heart Rate Notifications, Resting Heart Rate and Walking Heart Rate Average.
Reproductive Health
Basal Body Temperature, Cervical Mucus Quality, Menstruation, Ovulation Test Result, Sexual Activity and Spotting.
Results
Blood Alcohol Content, Blood Glucose, Electrodermal Activity, Forced Expiratory Volume – 1 sec, Forced Vital Capacity, Inhaler Usage, Insulin Delivery, Number of Times Fallen, Oxygen Saturation, Peak Expiratory Flow Rate, Peripheral Perfusion Index and UV Index.
Vitals
Blood Pressure, Body Temperature, Heart Rate and Respiratory Rate.
In the upper right corner of the Health Data screen, you will see the Personal Profile icon. Tapping on the icon opens your Personal Profile. See details about the Personal Profile later in this post.
Sources View
In the Sources view, you can view and manage all apps and devices that have requested access to the data stored in the Health app. For each app or device, you must explicitly give permission for every data type that access has been requested for. You will see a list of all apps followed by a list of all devices that have requested access to data in the Health app.
Please note that some devices don’t write directly to the Health app. These devices will have an app that is installed, and the app will receive the data from the device and write it to the Health app. If you don’t see your device in the list of devices, see if there’s any app that is writing the data on behalf of the device.
Apps
Tap on any app in order to see what data types the app is allowed to write to, or read from the Health app. Under the heading Allow App to Write Data, you will see a list of all data types that can be written and under the heading Allow App to Read Data, you will see a list of data types that can be read. Tap the switch next to any data type to change the access permissions.
Below the list of data types that can be written by the selected app (note – not all apps will request to write data) you will see the label Data. Tap on this label to see all of the data types that have already been written to the Health app by the selected app. Tap on any of the Data Types to see the actual data that has been written.
Devices
Below the list of Apps, you will see the list of devices. In the list of devices, you will see your iPhone, and if you are using an Apple Watch, you will see that as well. If you tap on the iPhone or Apple Watch you will see a list of all the data types that were written by either of those devices. They will be listed by category. If you tap on any data type, you will see all of the data that was written by that device.
If you have any 3rd party devices that are connected to the Health app (heart rate monitor, smart scale, blood pressure monitor, etc.) they will be shown after the Apple devices. If you tap on any of these devices, you will see Update Health Data with an indication of whether it’s enabled or not. Tap the switch next to the device name to change the permission.
Below Update Health Data, you will see which data type(s) that device has requested to update. If you want to see this information, you will need to be patient. It seems to take several seconds until the data type(s) are shown.
Medical ID View
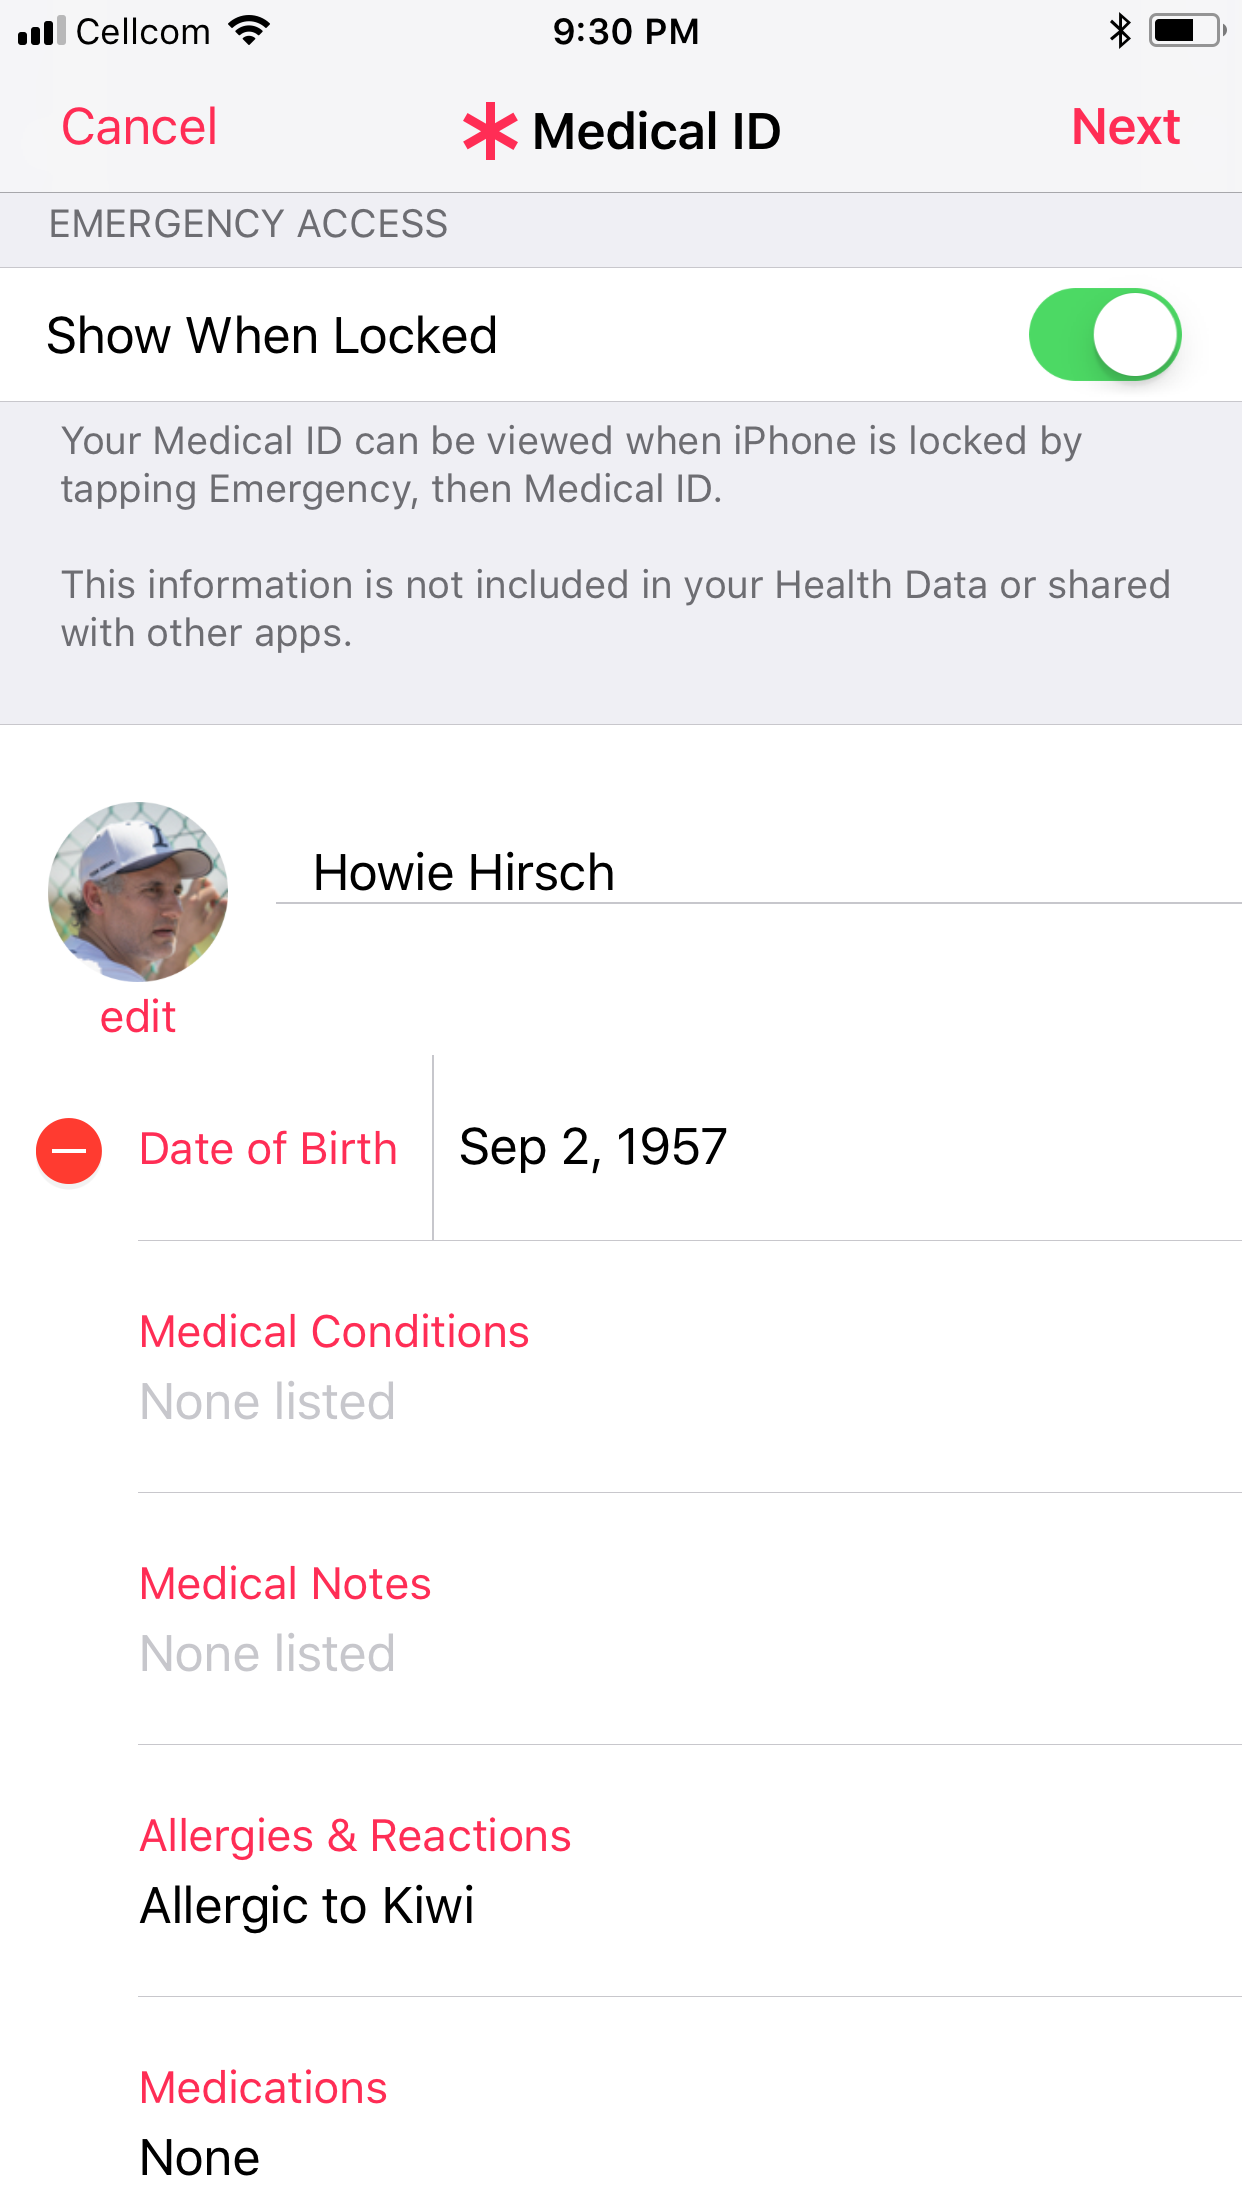 The Medical ID is part of the Health app. It has the following information:
Personal Information – Name, Photo, Date of Birth, Height, Weight
Medical Information – Medical Conditions, Medical Notes, Allergies & Reactions, Medications, Blood Type
Emergency Contacts – You can select multiple contacts from your Address Book to be specified as your emergency contacts. For each emergency contact, you specify their relationship with you, and if there are multiple phone numbers, you choose the one that you want.
Organ Donor Information – Yes / No / Register with Donate Life
When you select Medical ID at the bottom of the screen, if you haven’t already created your Medical ID you will be able to create it and enter any of the above information. If you have already created your Medical ID, you will see its details.
You can edit it by tapping the Edit button in the upper right corner. When you have finished editing, tap Done in the upper right corner to save the changes, or tap Cancel in the upper left corner to discard any changes.
While editing the Medical ID, you can set it to Show When Locked. If you do that, your Medical ID can be accessed when your phone is locked. This can be important in an emergency situation as it will allow medical personnel to access your Medical ID.
Setting up the Medical ID could potentially save your life. This is something that you should do right away, and let others know about this as well. Please note – setting Show When Locked also has its vulnerabilities.
If you set this, anyone who has access to your phone, can access your Medical ID. If you have set Emergency Contacts, those people can be called when your phone is locked. If you have information that isn’t important for an emergency situation, and is personal information that you don’t want others to see, you should not include such information in your Medical ID.
There are several ways to view the Medical ID on an iPhone that is locked. After unsuccessfully trying to unlock the phone, you will see the Emergency button in the bottom left corner of the screen. Tap the Emergency button. If Show When Locked is enabled, you will see * Medical ID in the bottom left corner of the Emergency screen. Tap to view the Medical ID and all of its information. From this screen, you can call any of the Emergency contacts specified in the Medical ID.
On all iPhone 7 and earlier models, press the side button 5 times quickly. Then swipe right on Medical ID and you will see the Medical ID.
On all iPhone 8 and later models, press and hold the side button and the volume up or down button together for five seconds. Then swipe right on Medical ID and you will see the Medical ID. Beware – if you press the side button 5 times quickly on an iPhone 8 or later, it will automatically trigger an Emergency SOS call and you will hear a loud siren tone. If you’ve done that unintentionally, you will have 3 seconds to cancel the emergency call.
If you are using an Apple Watch, the Medical ID can be viewed by pressing and holding the side button on the watch for 2-3 seconds and then swiping to the right on Medical ID. All of the Medical ID information will be displayed on the watch. If there are phone numbers that have been saved as Emergency Contacts, you can tap any one of them to place a call to that person. If your Apple Watch does not have the Cellular option, you must have the iPhone nearby in order to place the call.
Viewing Detailed Data
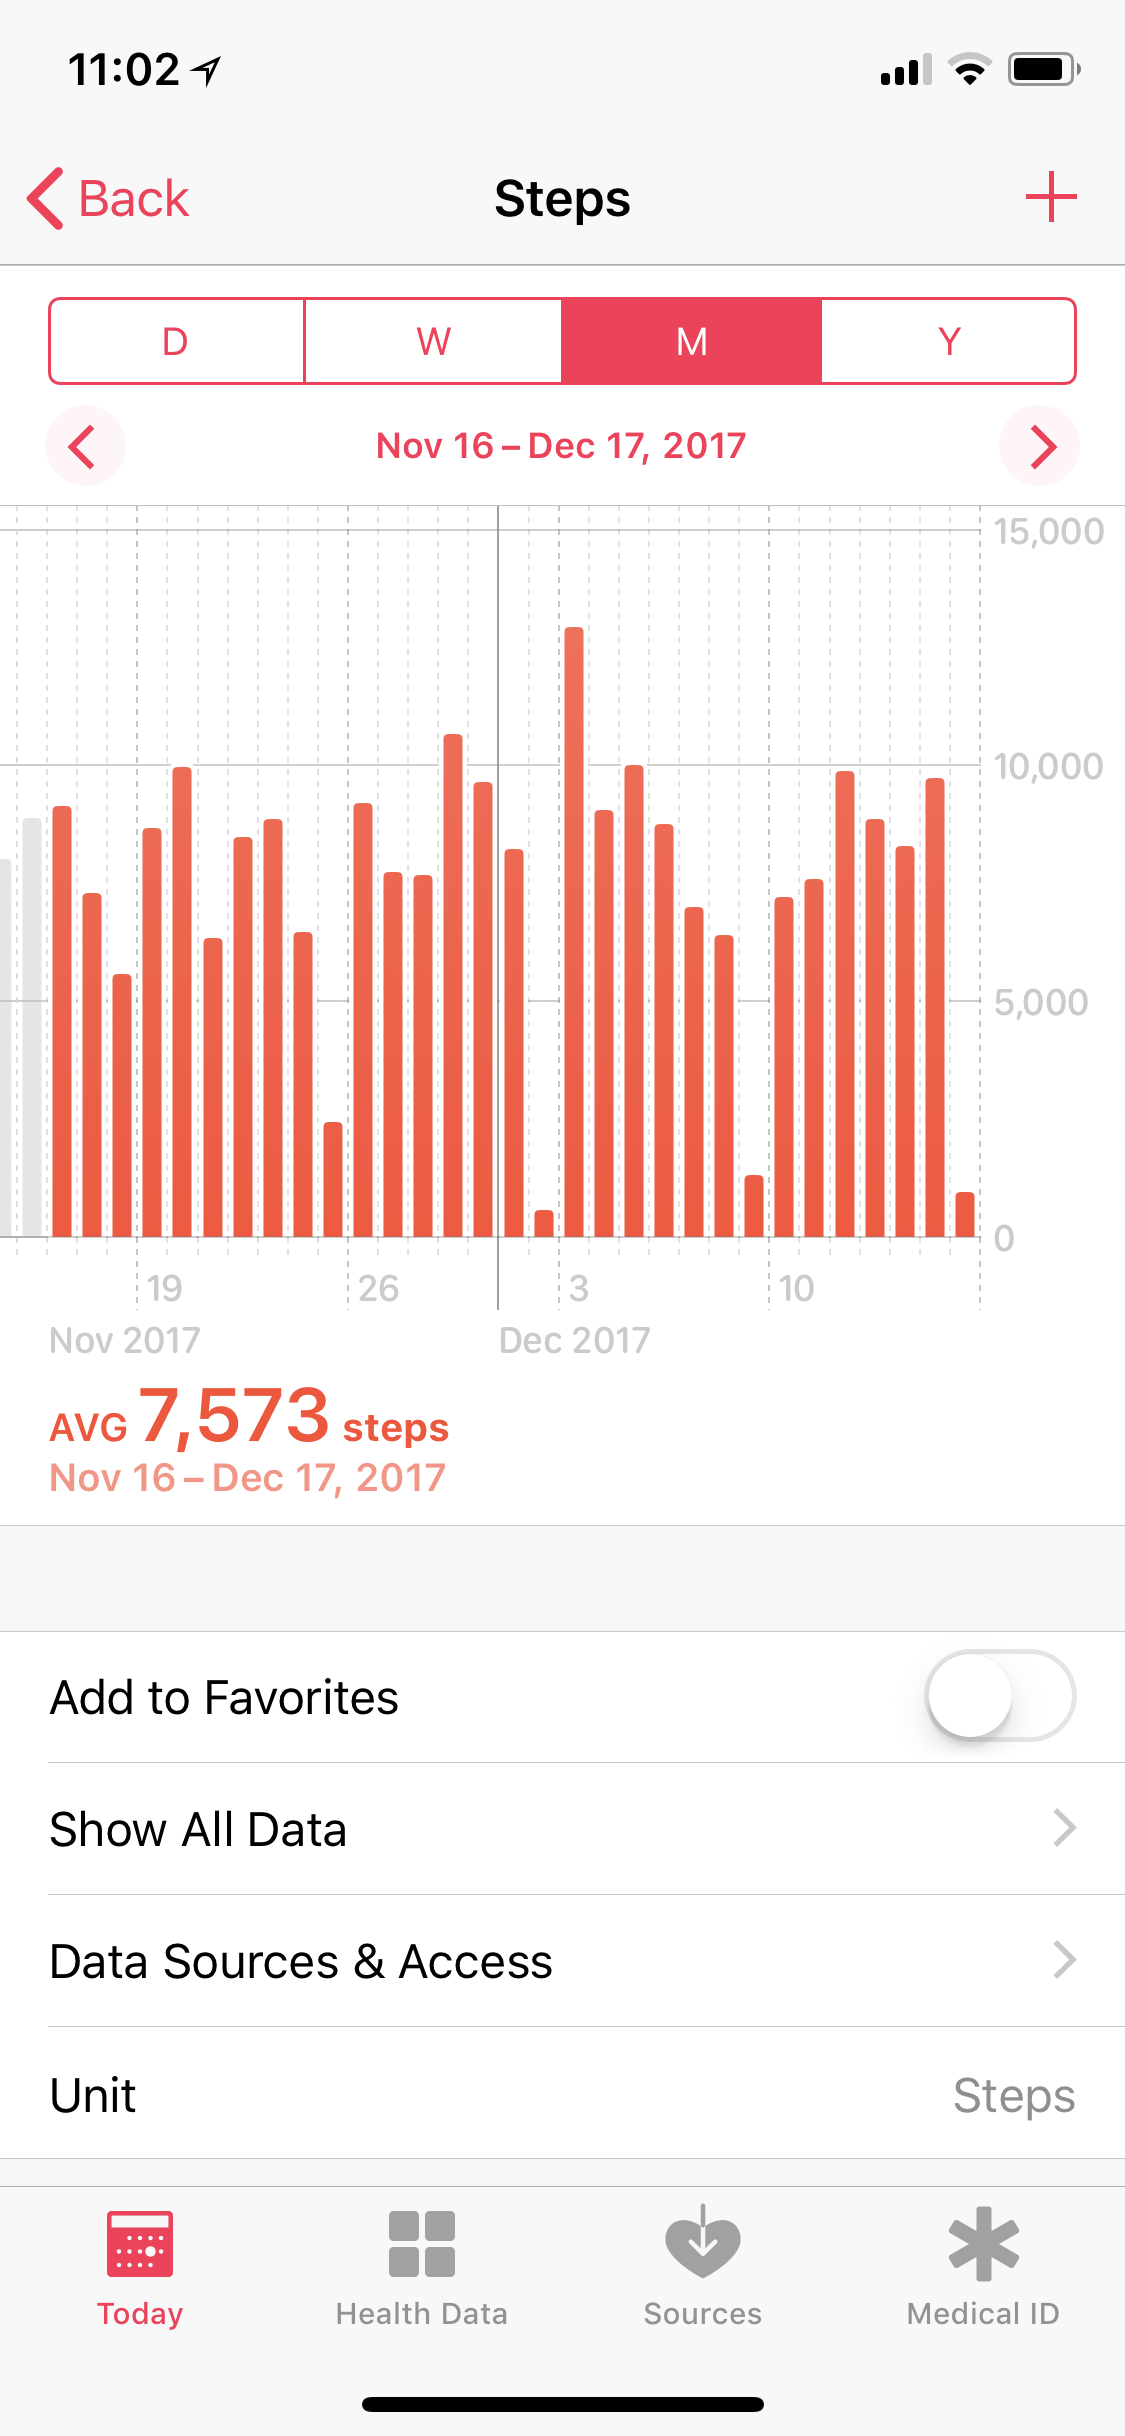
You can view detailed data for any data type in the Health app either from the Health Data view or the Today view. In the Health Data view, choose a category, and then within the category, tap on any data type. In the Today view, tap on any data type that is shown.
The selected data type will be shown at the top of the screen. Tap in the upper left corner to return to the previous screen (either Today or Health Data). Some data types will have a + button in the upper right corner. Tap on that button if you want to add new data for that data type.
Tap on the D(ay), W(eek), M(onth), or Y(ear) button at the top of the screen to select the time period that you’d like to see. The data that is shown on the chart is specific for each data type. At the bottom of the chart, you will usually see a Total or an Average that is relevant for the selected data type.
You can swipe right or left on the chart, or you can tap < or > above the chart in order to view data for earlier or later periods of time. If you want to see the details of a specific entry in the chart, tap on that entry, and you will see the details at the top of the chart. If you tap, and hold your finger down, you can swipe left or right in order to see details of any data that is visible in the chart.
Below the chart are the following:
Add to Favorites – You can specify this type as a Favorite. In the Today view, all data types that are Favorites will be shown before any other data types.
Show All Data – Tap this to see all of the data for this data type. For many data types there will be a lot of data, and looking at individual records will not be that useful. In that case it’s better to look at the charts for that data type, or to use a 3rd party app that displays the data in a more useful way.
Data Sources & Access – This allows you to see which apps or devices have requested access to the selected data type. You will also see which apps or devices have been granted access. Apps that have requested to read data are listed under Apps Allowed To Read Data. Those that have been given permission to read data will be shown with the on-off switch in green. Permission can be given or revoked by tapping on the switch next to the app name.
Apps that have requested to write data are listed under Data Sources. The ones that have permission to write data are shown at the beginning of the list and those that haven’t been given access are at the bottom of the list. The names of the apps that haven’t been given access are grayed out and labeled as Inactive. If you tap on any app you can see all of the data of that type that has been written by the selected app. If you want to change the write permissions, you’ll need to do that in the Sources view.
Unit – This shows what units have been selected for that data type. Not all data types show units. For some data types it is possible to choose different units. For others, the unit cannot be changed. If the Unit has a > on the right edge of the screen, then you can choose the units for that data type. Tap Units to see the options, and select a different unit if you’d like.
Apps – For many data types, there is a list of recommended 3rd party apps that are related to that data type. Tapping on an app will show you the app in the App Store.
Description – For most data types, when you scroll down to the bottom of the screen, there is a detailed description of the data type.
Personal Profile
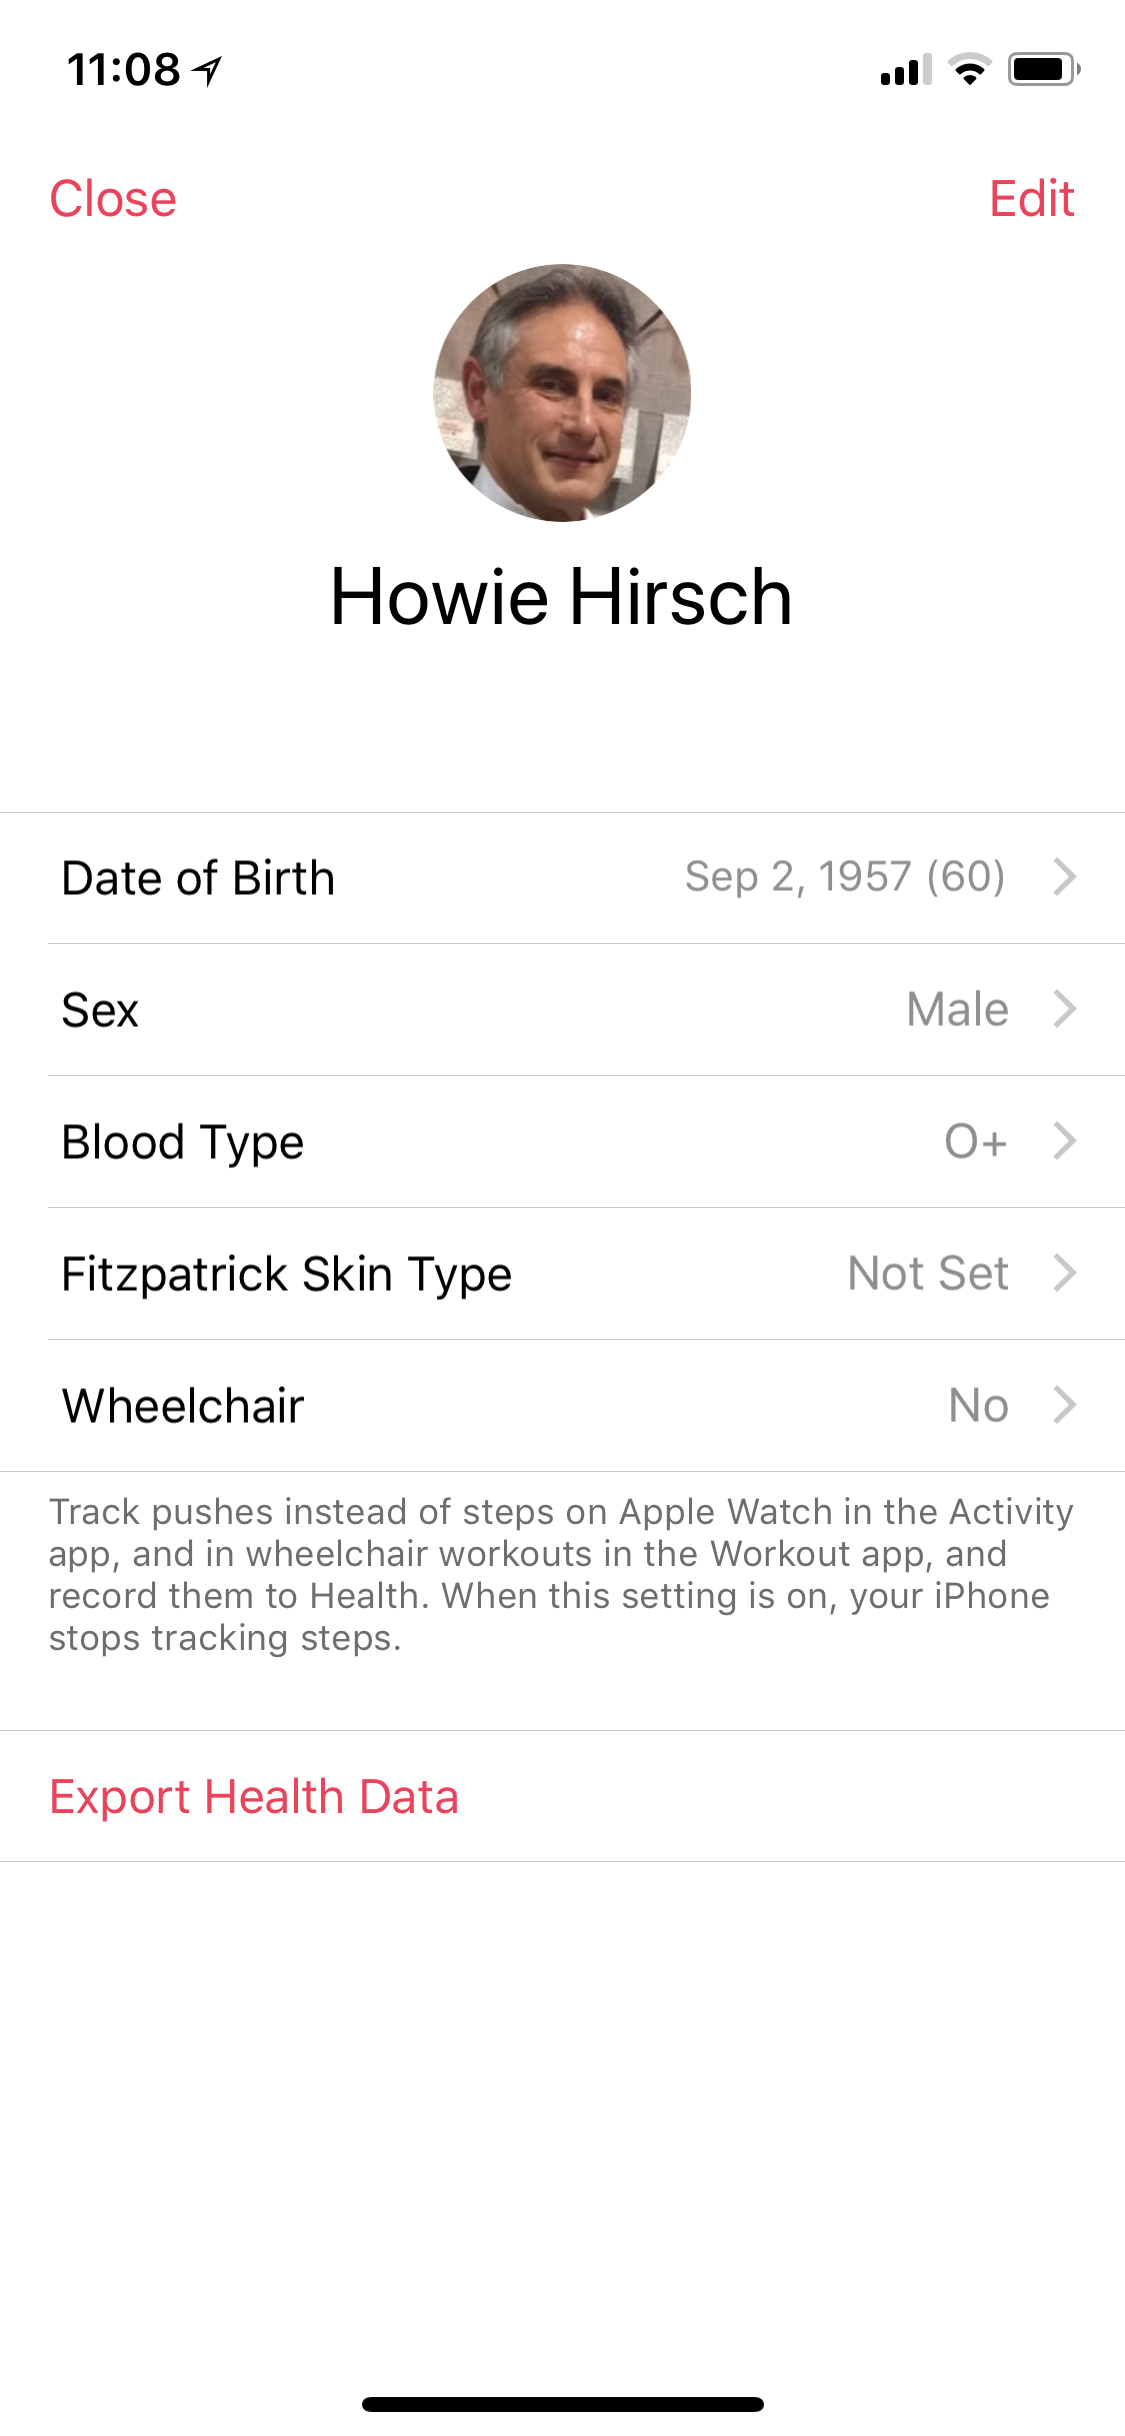 If you tap the
 ![]() icon that is shown in the upper right corner of the screen in the Health Data view or the Today view, you will see the Personal Profile screen.
icon that is shown in the upper right corner of the screen in the Health Data view or the Today view, you will see the Personal Profile screen.
On this screen, you will see the following information:
- Name
- Date of Birth
- Sex
- Blood Type
- Fitzpatrick Skin Type
- Wheelchair (No or Yes)
If you have specified a contact as My Info in the Contacts section of the Settings app, that contact information will be used automatically when you set up your Personal Profile in the Health app. If that contact has a Photo, it will be used in the profile as well.
To edit any of this information, tap Edit in the upper right corner of the screen. To save any changes, tap Done in the upper right corner of the screen. If you don’t want to save the changes, tap Cancel in the upper left corner.
What’s Next?
If you have an Apple Watch, or you want to learn about built in Health and Fitness apps on the Apple Watch, make sure to check out these two blog posts: